Whether you’re curious and want to pick up a new hobby or want to learn in case you need the knowledge in a survival situation, this post will shed light on how to make snowshoes.
If you are getting interested in snowshoeing, chances are you want to know as much you can about it—even how to make your own snowshoes! If ever you find yourself in a situation where you have to set foot outside during winter to travel in deep snow, but you don’t have available snowshoes at all, knowing this skill might come in handy and save you from a dangerous situation.
No one said it would be easy. The process may take some time. You would need to put in hard work and a lot of effort to make a decent pair of snowshoes. But, hey it could be fun! Crafting snowshoes from scratch can be a fulfilling activity. Check out the following ways on how to make snowshoes. Have fun creating your own crafted snowshoes!
Wooden Snowshoes
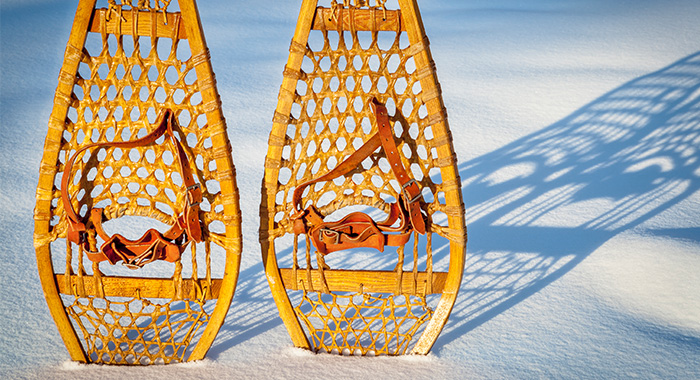
Are you up for the challenge? The materials needed to make this type of snowshoes are readily available. Gather some foraged materials, and prepare to get busy for hours. Mother Earth News shares how to make snowshoes using simple newspapers, scrap wood, rawhide, and the traditional material that the Native Americans used a few centuries ago—stand of ash trees. Ash is an ideal material because it stays firm as you bend it to your desired shape.
Create a Newspaper Pattern
- To cut a newspaper pattern for the frames, just fold the sheet diagonally across to form a triangle. The diagonal will be the center of the snowshoe frame.
- To have perfectly symmetrical snowshoe, make sure to mark the pattern when the newspaper is folded.
- Mark where the widest part of the frame on the paper—three-eight of this distance or about 12 inches. A common snowshoe is about 30 inches long for proper weight distribution.
- From that point, draw the outline of the shoe from the toe to heel. Make sure the curve is round but tapers toward the heel.
- Consider as much surface area as possible for the shoe when you cut out the pattern.
Make the Form
- Build a form by nailing two 3/4 inch forms on a piece of plywood.
- Then, nail 12 wedges that are three-fourths inches away from those forms.
- Use an ash wood that measures about seven feet long and around a three-fourths inch thick.
- Make sure the sides are smooth and knot-free using a drawknife.
- Bend the ash wood to fit into the wedges. If it doesn’t easily bend, steam it a bit to make it softer. Allow the wood to dry for a couple of weeks for the best result. For well-detailed steps on how to make the form and how to make the wood more flexible, you can check out this how to make snowshoe video.
You can also use spruce trees with boughs for DIY snowshoes for wilderness survival as suggested by Snowshoes Magazine.
Add in Crossbars
It’s time to make the snowshoes more sturdy by adding in crossbars.
- Insert four crossbars about 1 inch wide each within the frame. Doing so helps retain the shape of the snowshoe.
- Drill holes in the sides of the frame where you can insert the end of the crossbars. Make sure they are of a snug fit.
- Sand out the frame and crossbars to smoothen the edges.
Webbing
Whether you want to go for traditional rawhide lacing or modern neoprene webbing on your snowshoe, the choice is yours to make.
Rawhide
As a classic piece of historic tradition, rawhide is an incredibly strong material—perfect for snowshoe lacing. The rawhide lacing is pliable once wet. Once it dries out, it contracts and becomes more durable the more it’s frequently used.
- For snowshoe lacing, use green hair-free rawhide strips.
- Drill small holes around the frame.
- Weave the rawhide strips across and around the frame, creating a diamond pattern. For step-by-step snowshoe web weaving, watch the uploaded video of Survival Mastery.
Neoprene
Unlike rawhide, neoprene is a synthetic rubber that is resistant to moisture and low temperatures. It doesn’t require maintenance as it stays as-is for a long time. It can last three times longer than rawhide. It’s convenient to use as a lacing to snowshoes because it doesn’t require creating the pattern. All you have to do is fix the webbing onto the frame.
The process may be time-consuming and meticulous, but the outcome will be satisfying. Creating a pair of hand-crafted snowshoes is a great experience to try. You can actually strap on your personalized snowshoes made from scratch!
Straps
The last step to complete your DIY snowshoes is to create a set of bindings to attach the snowshoes to your boots. You can use neoprene, leather, or even lampwick. Attach the strap over the toe of the boot. Wrap securely around the toe cord. Cross it over the instep. Then, tie it around the heel. Off you can go snowshoeing.
CPVC Snowshoes
Don’t you know you can also make snowshoes using the CPVC pipe? Boy’s Life has well-detailed instructions on how to make snowshoes using CPVC pipe. Using CPVC is more recommended than PVC due to its flexibility and durability.
Materials Needed:
- 1 six-ounce can of CPVC clear cement (recommended schedule 80)
- 2 pieces of ¾-inch hot/cold CPVC pipe, 10 feet long each
- 4 ¾-inch CPVC pipe tees, shaped like the letter “T”
- 20 pieces of 45-degree-angle CPVC elbows
- 200 feet of ¼-inch hollow braid poly rope
- Bungee cords, rope, Velcro or any other material to attach snowshoe to the foot
Tools Needed:
- Yardstick or measuring tape
- Hand saw, hack saw or PVC pipe-cutting tool
- File or sandpaper
- Clamp vise or another set of hands
- Following the measurements provided by Boy’s Life, cut the 10-foot-long pipes into 26 pieces of pipes with the following lengths:
- 2 pieces, 4 inches long
- 2 pieces, 8 inches long
- 4 pieces, 6 inches long
- 4 pieces, 18 inches long
- 6 pieces, 1-1/4 inches long
- 8 pieces, 3 inches long
- Smoothen the rough edges using the file or sandpaper.
- Work on the front half first. Assemble the pipes together by gluing each piece in place.
Front Half:
- Attach one piece of 45-degree-angle pipe on each end of one 4-inch piece of pipe.
- Attach a 3-inch pipe into the open end of both angles.
- Attach another 45-degree angle pipe at the end of each 3-inch piece.
- Attach a 1 and 1/4 inch pipe into both angles.
- Attach 45-degree angle pieces onto the 1 and 1/4 inch pipes. Adjust the position of the angle slightly facing up.
- Attach one 6-inch piece pipe into both angles.
- Attach one T-angle joint onto the end of each 6-inch piece. Then, join it together with an 8-inch pipe.
- Let the glue harden while you work on the next half.
Back Half:
- Attach 45-degree angles on each end of the 18-inch pipe.
- Attach a 3-inch pipe into each angle.
- Attach 45-degree angles onto both ends of 3-inch pipes.
- Connect the 45-degree angle pieces with a 1 and 1/2 piece of pipe.
- Attach the completed back half into the front half of the snowshoe. Allow drying for 24 hours.
Snowshoes Lacing
After creating the foundation, it’s time to create the lacings. Start and end with an eye splice for the lacings. Weave the rope back and forth around the pipe, in an over and under pattern. Put CPVC cement where the lace and pipe meet to secure the lace in place.
Secure the Snowshoes
You can use bungee cords, rope, Velcro or any other material to secure the snowshoes to your boots using the compression wrap method.
With a pair of homemade snowshoes, you can enjoy tramping through the snow. With attention-to-detail, patience, and hard work, you can make your own snowshoes from scratch.
Sources:
How to Make Snowshoes, Carl E. Heilman II, Mother Earth News https://www.motherearthnews.com/diy/how-to-make-snowshoes-zmaz81ndzraw
How to Make Snowshoes: A Fun DIY Project for The Survivalist in You, David Dawson, Survival Mastery, http://survival-mastery.com/diy/how-to-make-snowshoes.html
Make Your Own Homemade PVC Snowshoes, Lore Postman, Boy’s Life, https://boyslife.org/hobbies-projects/projects/23375/make-your-own-snowshoes/
Making Your Own Snowshoes from Scratch, Benjamin Roussey, Snowshoe Magazine,
https://www.snowshoemag.com/2014/10/13/making-your-own-snowshoes-from-scratch-2/
DIY Survival Snowshoes Efficient Winter Trekking, Geek Prepper, https://geekprepper.com/make-your-own-snowshoes/